For many homeowners, roof replacement is something that only happens once or twice in a lifetime. Because of that, it’s completely normal to wonder what actually happens during installation day.
Professional roofing crews follow a structured process to remove the old roof, install new materials, and clean up the property once the job is finished. Understanding this step-by-step process can help homeowners feel more comfortable and prepared when the project begins.
Step 1: Crew Arrival and Site Setup
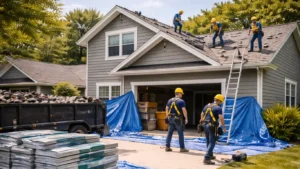
Roof replacement usually begins early in the morning when the roofing crew arrives with trucks, equipment, and materials. The first step is setting up the job site.
This setup often includes:
- Positioning ladders for safe roof access
- Placing dump trailers or disposal bins
- Laying protective tarps around the home
- Staging roofing materials for easy access
This preparation ensures the crew can work efficiently while protecting the surrounding property.
Step 2: Removing the Old Roofing Materials
The next phase is known as the tear-off. During this stage, the existing shingles and roofing materials are removed down to the roof deck.
This allows the roofing team to inspect the underlying structure and ensure the new roof will be installed on a solid foundation.
The tear-off stage is usually the noisiest part of the process, as shingles are loosened and removed across the entire roof surface.
Step 3: Inspecting the Roof Deck
Once the old materials are removed, the roof deck becomes fully visible. The deck is the wooden surface that supports the entire roofing system.
Roofers inspect the decking for any signs of damage such as:
- Rot or moisture damage
- Soft or weakened sections
- Loose or damaged boards
If any areas require repair or replacement, they are addressed before the new roofing materials are installed.
Step 4: Installing Protective Layers
Before shingles are installed, roofers apply protective materials designed to prevent water infiltration.
These layers typically include:
- Ice and water shield in vulnerable areas
- Synthetic or felt underlayment across the roof deck
- Drip edge along roof edges
These components provide additional protection against moisture and improve the durability of the roofing system.
Step 5: Installing Flashing and Ventilation Components
Flashing is installed around areas where water is most likely to enter the roof system. This includes locations such as chimneys, valleys, skylights, and roof transitions.
Roof ventilation components may also be installed or replaced during this stage. Proper ventilation helps regulate attic temperature and prevents moisture buildup inside the roof structure.
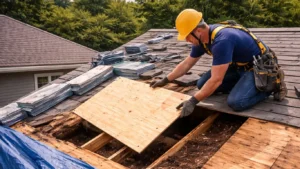
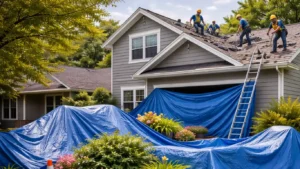
Step 6: Installing the New Shingles
Once the protective layers are complete, the installation of the new shingles begins.
Roofers start at the bottom edge of the roof and work upward, installing shingles in overlapping rows. This layering technique ensures water flows down the roof surface rather than underneath the shingles.
The process continues until the entire roof is covered and ridge shingles are installed along the peak.
Step 7: Job Site Cleanup
Once the new roof is fully installed, the crew begins cleaning the job site. This step is an important part of the roofing process.
Cleanup typically includes:
- Removing leftover materials
- Collecting debris from tarps
- Performing magnetic nail sweeps
- Clearing tools and equipment from the property
The goal is to leave the property as clean and organized as possible once the project is complete.
Step 8: Final Inspection
Before leaving the site, the roofing crew or project manager performs a final inspection of the completed roof.
This inspection ensures that:
- Shingles are installed correctly
- Flashing and ventilation components are secure
- The roof meets installation standards
- The property has been properly cleaned
This final check helps ensure the roofing project meets professional quality standards.
A Structured Process from Start to Finish
Although roof replacement may seem like a complex project, experienced roofing crews follow a clear and organized process to complete the work efficiently.
From the initial setup to the final inspection, each step is designed to ensure the new roof is installed correctly while protecting the home and surrounding property.
For most homes, the entire process can often be completed in a single day depending on the size and complexity of the roof.